Home > Single Post

Top Mistakes to Avoid When Installing Rubber Flooring

Lanhe Floor

need any help ?

Phone

+86 17366625375

Email

info@lanhelfoor.com

Work Hours

Mon - Fri : 09:00 AM – 18:00 PM

Subscribe for our latest article

Follow us :

Top Mistakes to Avoid When Installing Rubber Flooring

Installing rubber flooring seems simple, but small mistakes can turn into costly problems. Let’s make sure you avoid common pitfalls and get the best results from the start.

The biggest mistakes when installing rubber flooring are skipping subfloor preparation, using wrong adhesives, and not allowing proper acclimation time. Always plan carefully to ensure a professional and lasting result.

Rubber flooring installation mistakes showing subfloor cracks, unused adhesive, and a clock.

Choosing the right rubber flooring is important, but even the best material can fail if not installed properly. I have seen customers order perfect floors but run into big issues because of small avoidable mistakes. Let me walk you through the main traps to avoid, so your installation goes smoothly and your floor lasts as long as possible.


Why is poor subfloor preparation1 such a big problem?

Skipping subfloor preparation is the number one reason rubber floors fail early.

Without a flat, dry, and clean subfloor, rubber tiles and rolls won’t bond properly, causing bubbles, shifting, or curling over time. Always inspect and prep your base carefully.

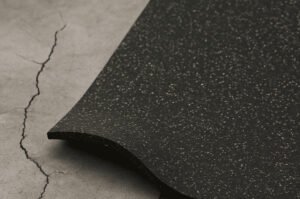
Uneven concrete subfloor with cracks under partially installed speckled rubber tile.

Many customers think rubber floors are so strong that they can cover anything. I get it — rubber is durable. But the floor beneath it matters a lot. If your concrete has cracks, moisture, dust, or bumps, it will transfer these problems to the rubber layer. A bad base will lead to lifting edges, trip hazards, and early damage.

Here’s a simple guide:

Subfloor ProblemImpact on Rubber FloorHow to Fix
MoistureAdhesive failure, mold growthUse moisture barriers2, test for dampness
Uneven surfaceVisible bumps, poor bondGrind or level with compound
Dirt and dustWeak adhesive bondClean thoroughly, vacuum well
CracksRubber tears, uneven appearanceFill cracks before installation


How does choosing the wrong adhesive lead to flooring failure?

Many people underestimate how critical adhesive choice is for rubber flooring success.

Using the wrong adhesive for your rubber floor type and environment will cause peeling, shifting, or bubbles. Always follow manufacturer instructions on glue selection.

I have seen gyms invest heavily in beautiful composite rubber tiles, only to watch sections lift off because they used generic construction glue instead of special rubber adhesive. Rubber has unique flexibility and needs adhesives that can flex and resist moisture.

Here’s a quick table to help you choose:

Flooring TypeRecommended Adhesive
Rubber Tiles (Tiny Granules, Composite)Two-part polyurethane adhesive
Rubber RollsPressure-sensitive or acrylic adhesive
Outdoor Rubber TileUrethane adhesive (weather resistant)

And don’t forget: humidity, temperature, and even the surface material affect adhesive performance. Always check the datasheet or ask your supplier for advice — like me at Lanhefloor, I am always happy to help.


Why is not letting the flooring acclimate a big mistake?

Installing rubber flooring immediately after delivery can ruin the installation.

Rubber tiles and rolls need time to acclimate to room temperature and humidity, usually at least 24-48 hours, to avoid expansion, shrinkage, or gapping later.

Rubber is a natural material, so it reacts to temperature changes. If you install it while it’s still cold from shipping, it may expand and create bumps. If you install it hot, it may shrink later and leave gaps. I once had a client who rushed a large installation — they called me two weeks later complaining about gapping, but sadly, the only fix was reinstalling the entire floor.

To acclimate properly:

  1. Bring all tiles or rolls into the installation area.
  2. Let them sit flat (not stacked) for at least 24-48 hours.
  3. Keep room conditions stable (no big drafts or heat blasts).

This simple step protects your investment and ensures a smooth, professional look.


What happens if you skip layout planning before installation?

Jumping into installation without layout planning causes ugly results.

Failing to dry-lay and map the flooring can cause misaligned tiles, uneven edges, and wasted material. Always pre-plan your layout, especially in large or irregular rooms.

I once helped a gym owner who had ordered beautiful interlocking rubber tiles. They started installing from a random wall, without checking if the edges would match. Halfway across the room, the tiles no longer lined up. They had to pull up dozens of glued tiles and start over — wasting time, money, and a lot of patience.

Best practices:

  • Dry lay a few rows before gluing.
  • Mark center lines in large spaces.
  • Plan cuts near walls where needed.
  • Leave small expansion gaps if required by the material.

A good layout saves hours of work and gives a clean, professional finish.


Conclusion

Good subfloor prep, the right adhesive, proper acclimation, and smart layout planning are the keys to a successful rubber floor installation.


  1. Understanding subfloor preparation is crucial for ensuring the longevity and performance of rubber flooring. Explore this link for detailed insights.  

  2. Moisture barriers are essential for preventing damage in flooring. Learn how they function and their importance in this informative resource. 

Get in touch

Send us message if any needs, we will reply you within 24hours